How to Enable Website on Chrome
Enable website on Chrome typically refers to allowing certain permissions or features for a specific website. Here are some common tasks related to enabling websites on Chrome:
Chrome offers many features for users to customize the browser. For example, it has a dark mode that allows users to view websites in a darker window.

- Allowing Pop-ups:
- If you want to allow pop-ups on a specific website, click on the padlock or information icon next to the website’s address in the address bar.
- In the pop-up that appears, find the “Pop-ups” setting and choose “Allow” from the drop-down menu.
- Enabling JavaScript:
- JavaScript is a programming language that is often used to enhance interactivity on websites. If a website requires JavaScript to function and it’s not working, you may need to enable it.
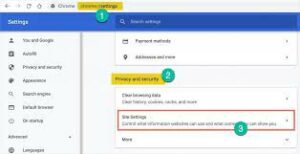
- Go to Chrome Settings by clicking on the three vertical dots in the top-right corner, then select “Settings.”
- Scroll down and click on “Privacy and security” in the left sidebar.
- Click on “Site settings” under the “Content” section.
- Find “JavaScript” in the list and make sure it’s set to “Allowed” for the specific site.
- Allowing Flash (if applicable):
- Note that Flash is being phased out, and many websites have moved away from using it. However, if you encounter a site that still requires Flash, you might need to enable it.
- Similarly, go to Chrome Settings, then “Privacy and security,” and click on “Site settings.”
- Look for “Flash” in the list and set it to “Allow” for the specific site.
- Managing Cookies:
- If a website is not functioning properly due to cookie settings, you can adjust these settings.
- In Chrome Settings, go to “Privacy and security” > “Site settings.”
- Look for “Cookies” and make sure it’s set to “Allow” for the specific site.
- Adding Website Exceptions:
- You can add site-specific exceptions for various settings by going to Chrome Settings > “Privacy and security” > “Site settings.”
- Under permissions like Camera, Microphone, Location, etc., you can add specific sites to the allow list.
How to enable a website
If you want to allow a website on Chrome, you can do it through the Site settings. To add a website to your allowed zones, click the info or warning icon beside the site address in the zone textbox, then type the website name into the textbox and click Add.
Once you install the extension, click on the kebab menu icon present in the Chrome toolbar and select ‘Options’. This will open the extension settings where you can manage your list. In the settings, locate the first checkbox option which says ‘block pages from websites not in my list’. Enabling this option will block images, scripts and other resources from websites that are not present in your list.
This can help you avoid unwanted data collection from web sites and prevent unwanted tracking from happening across multiple browsing sessions. However, it can make using some sites a bit more frustrating as you will have to log in again each time you close and reopen the browser.
How to change the permissions for a website
Websites often ask for permissions that you might not want them to have, like accessing your location or saving cookies. Thankfully, Chrome makes it easy to change these permissions on a per-website basis. To get started, navigate to the desired website and click on the ‘padlock’ icon present in the omni bar at the top (Google will be changing this to toggles sometime soon).
This opens up an overlay window that lists all the permissions the site has requested. Each of these can be configured to either Allow, Ask before accessing or Blocked. The latter will prevent the website from having any access to your personal information, however it may break some features of the site. You can also set specific permissions for the sites you visit frequently, such as your zoom level settings. This will make it quicker for you to browse your preferred websites. This works on both desktop and mobile versions of Chrome.
How to set the global defaults
If you’re a Chrome user, you might have to block certain websites to keep your web browsing experience safe. These websites could contain malware or distract you from your work.
The search function in Chrome, also known as the Omni box, provides suggestions based on your previous searches and the URLs you enter. The Omni box can also suggest sites from your bookmarks and autocomplete forms you have filled out. It can even show your search history in a unique sandbox web session, known as Incognito mode.
You can manage the privacy settings for each website individually through Site settings. To access this option, click the info or warning icon next to the site address. This will open a page with all the permission categories you can configure for that website. The settings you change will be saved automatically. You can also clear and reset them if you need to.
How to change the permissions for a single website
Many users are concerned about websites accessing their location, microphone or camera. Others worry about websites accessing their data for advertising purposes or even malicious content like computer viruses. Enable Website On Chrome
It is possible to change the permissions for a single website in Chrome without changing the global defaults. Simply click the three-dot menu button and select Settings. Then, scroll down to the Privacy and security section and select Site settings. Google
Here, you can view all the permissions that have been granted to websites and change them if needed. For example, if a website was allowed to download files in the background (something that can sometimes be dangerous), you can change this to ask every time. You can also mute sites that automatically play videos or clear data and reset permissions for specific categories here too. (Though resetting all permissions is recommended.) This is a great way to control what websites have access to your information over time.

Leave a Reply