
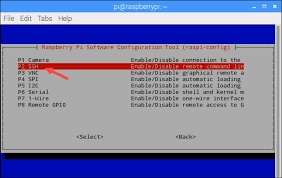
How Do I Enable SSH Connections on Ubuntu?
You may be wondering how to enable SSH connections on Ubuntu. To enable SSH on Ubuntu, you can either press the CTRL+ALT+T keyboard shortcut or search for the Terminal icon in the Ubuntu Dash. After logging in, you should receive a confirmation message. This is a good sign because it means SSH has been enabled on the remote machine. After you have enabled SSH, you should be able to use it to make secure connections.
There are several ways to configure SSH connections. One is to run your own SSH server instance. This is usually not the best idea, as running as an ordinary user can violate security policies. Alternatively, you can configure the main SSH server instance, which is run by machine administrators. There are some important considerations to make when you are configuring SSH connections Google.
SSH connections need to have an appropriate username and password. You can do this using the command line or the Adaptive Security Device Manager. Regardless of the method you choose, it is important to ensure that your credentials are secure. You should also ensure that you backup your SSH keys separately. To backup your SSH keys, locate them in the /usr/local/etc/ssh/ directory.
How To Configuring Log Level:
To enable SSH connection sharing, click the “Enable connection sharing” option. By default, Windows does not support this feature. The “Connection sharing timeout” field lets you specify a timeout in minutes. The “Path to SSH executable” field will tell you the path to the SSH executable directory on your device.
If you’re using OpenSSH to connect to a remote server, you can control how much detail it logs in SSH messages by configuring Log Level. You can choose QUIET, INFO, VERBOSE, or DEBUG, which differ based on the level of verbosity you want. If you need to debug a problem, a more verbose output may be useful. Enable SSH Connections.
How To Configuring SSH:
The default setting for a SSH connection is DEBUG. Increasing the level of detail will cause SSH to log more information about a connection’s progress. If you want less information to be recorded, you should disable this setting. Similarly, decrementing the level of verbosity will result in the output being shorter and less detailed.
In addition to logging, you can also choose to send debugging data to a separate file. The -E option in OpenSSH allows you to write debugging data to a file, which is helpful for troubleshooting. However, you should not use this option for production, as it can compromise your privacy and consume a lot of disk space. It’s recommended send debugging data to a dedicated log file instead.
How To Configuring SSH Key-Based Authentication:
SSH key-based authentication is a way to improve security and simplify the login process. It is also a good way to provide secure access to cloud servers. To enable SSH key-based authentication, you should use an SSH client such as Pu TTY Tray or OpenSSH. Then, you should add the key to the home directory of your user account. Once you have added the key, you should restrict the use of it to this account.
The key will be stored in a directory owned by the root user. The OpenSSH server will look for authorized keys in this directory. The user can then add more keys to their account or sell them for Bitcoins. It is important to note that these keys are permanent and will not expire.
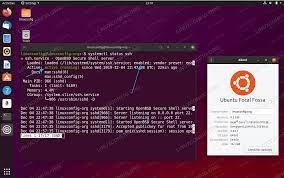
Enabling SSH On Ubuntu:
- Open your terminal either by pressing Ctrl+Alt+T or by clicking on the terminal icon and install the openssh-server package by typing:
- sudo apt update sudo apt install openssh-server. …
- Once the installation is complete, the SSH service will start automatically.
- Ubuntu comes with a firewall configuration tool called UFW.
- If the firewall is enabled on your system, be sure to open the SSH port:
Configuring SSH key-based authentication is simple. You will use a public and private key to authenticate to a remote server. You will need to protect the private key with a password to protect it from theft or misuse.
Leave a Reply