
How to Enable YouTube Live
If you’re a channel owner, you may be wondering how to enable YouTube Live. If so, read this article to learn how to do it. Then, follow these steps:
In order to enable YouTube live streaming on your Facebook page, you will need to add a destination. Adding a destination to your profile will allow you to share your videos on other social media sites. However, you can only distribute your videos to other channels if you have a personal profile page. If you are using a Facebook business page, you will need to add a YouTube destination to your profile page first Google.
Once your YouTube channel is enabled for live streaming, you need to connect it to Stream Yard. YouTube takes about 24 hours to process your request. Once you have your channel connected, you can begin creating your live stream. When you publish your live stream, YouTube creates a post on your channel with a thumbnail image. You can also upload a custom thumbnail image for your stream. Make sure your thumbnail image is at least 1280×720 so that you can be seen on YouTube.
Why Can I Not Go Live On YouTube:
The next step is to connect your account with YouTube. This process is easy and straightforward – simply go to your Restream Dashboard and click on “Add destination”. After clicking on the YouTube icon, you must enter your username and password to complete the authorization page. Remember that your account must be valid, as it is not enough to simply use a Gmail account and connect it to YouTube. If you don’t use the correct account, the system will give an error and you will not be able to start your live stream.
If you don’t want your viewers to see your videos on the homepage, you can set a default YouTube destination for your video. In this way, your video will show up in the search results, and users will be able to find your video. YouTube will automatically send your videos to the top of the search engines for the keyword they are searching for. Then, you can start your live stream, and your viewers will be able to find your video and start watching it.
How To Enable Live Streaming On YouTube 2021:
The Switchboard Cloud allows you to stream your live video content to YouTube. To add a YouTube destination to your Switchboard Cloud account, you must first authorize the service. YouTube API services allow users to authenticate with Switchboard, and you must accept Google’s privacy and terms of service. Once authorized, you can begin streaming your live video content. You can also add more than one YouTube destination to your account.

To add a YouTube destination to your Switchboard Cloud video streaming account, simply use the same process as adding other streaming destinations. First, log into your Switchboard Cloud account. Next, click on ‘Add a YouTube destination to your account’. Follow the steps in the video creation process. You’ll need to install the appropriate encoder for YouTube, as well as a video encoder. After that, you’re good to go!
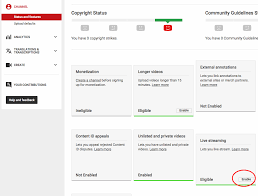
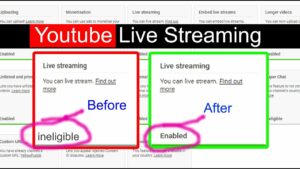
Enable Live Streaming:
- Go to YouTube.
- From the top right, click Create and Go live.
- If you have not already done so, follow the instructions to verify your channel.
- Enabling your first live stream may take up to 24 hours.
- Once enabled, you can stream live instantly.
With the Switchboard Cloud, you can simultaneously live stream to multiple streaming destinations. Live content is engaging, and spreading it across multiple platforms will maximize the engagement from viewers. When streaming live content, make sure to add a YouTube destination to your account. The Switchboard Cloud platform will also allow you to broadcast to various other social media accounts, such as Facebook and Twitter. This way, you can further amplify your reach.
Leave a Reply