How to Enable TLS 1.1.2 on Windows 10
Enable TLS 1.2 On Windows 10 in your computer, you must first disable TLS 1.0 and then configure the order of cipher suites. You can also check if TLS 1.2 is set as the default secure protocol in WinHTTP by following these steps:
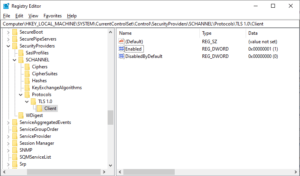
You can disable TLS 1.0 on Windows 10 by using the registry. To do so, open the Registry Editor by clicking on the Start accessory. In the search box, type “regedit” and click OK. On the next page, type the URL to test. Then, click the Page drop-down menu and select Properties. In the Connection section, type “TLS 1.0” as the key header, and then select the second subkey “client.” Google
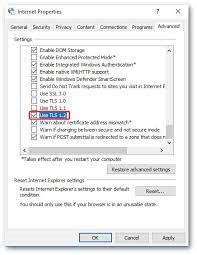
The easiest way to disable TLS 1.0 is through the Internet Properties window. To open this window, simply press the Windows key and S keyboard shortcuts. Enter ‘internet options’ in the search box. Click the Use TLS 1.0 option, deselect it, and click OK. You can also edit the registry in order to disable TLS 1.0 on Windows 10. To open the registry editor, click on the Start button and select “Run.” Once you are in the Registry Editor, enter ‘netscr.sys’.
How To Configure Cipher Suite Order:
You can change the SSL cipher suite order in Windows 10 by changing the setting under the Secure Socket Layer policy. To configure the order, click the “SSL Cipher Suites” policy setting. To change the default order, click “Not configured.” change the order, click “Enabled”. Once you’ve changed the order, you’ll see a new field with a long unbroken string of encryption options. To see this list more easily, you should put each encryption option on a separate line.
Depending on the type of security you want to implement, you might want to set the cipher suite order to the same order as you use for HTTPS. HTTPS servers are vulnerable to insecure ciphers. Insecure ciphers allow attackers to make an insecure SSL/TLS connection and launch different attacks. To avoid this issue, configure the SSL/TLS configuration to allow only secure ciphers.
How To Enable TLS 1.2 On Windows Server:
To check if TLS 1.1.2 is set as the default secure protocol, navigate to the HKEY_LOCAL_MACHINE key. You will need to change the value from 0x0A0, which is the default value for TLS 1.0, to 800. If TLS 1.2 is already set, you can simply change the registry value to 800 to make the change permanent. This method works on Windows XP SP3 and OS X 10.6 (Snow Leopard) as well as Android 2.3, or any version of the browser.
After performing the update, the next step is to change the default protocol on your server. In Windows, you can do this by editing the Default Secure Protocols registry subkey. This registry key will control which protocol is used by WinHTTP. It will also be used to enable SSL 2.0, 3.0, and 1.1. You can also disable SSL 1.0, 2.0, or 3.0 by editing this DWORD bitmap.
How To Configure OCSP:
If you want to configure OCSP on Windows 10, you must first set up the revocation configuration. This is the process of assigning an OCSP signing certificate to an OCSP revocation configuration. In order to do this, you can use the Automatically use renewed signing certificates feature. Right-click on the personal certificates store on your local computer and choose “Request New Certificate”. The certificate should be based on the OCSP Response Signing template and should include ‘OCSP Signing (1.3.6.1.5.5.7.3.9)’ in the Enhanced Key Usage (EKU) extension.
Enable TLS 1.2 in Microsoft Edge:
- Open Microsoft Edge.
- Tap Settings.
- Click on System.
- Click on Open computer proxy settings.
- Type Internet options in the search box and press Enter.
- Select the Advanced tab.
- Scroll down to the Security category and check the Use TLS 1.2 box.
- Click the OK button.
You need to know that OCSP implementation in Microsoft Windows is compliant with RFC 5019. RFC 5019 is a streamlined version of the original RFC 2560. However, the ASA requires signed requests and you should enable NONCE extension support in this version of Windows. The following is a step-by-step guide on how to configure OCSP on Windows 10 with ASA.
Leave a Reply