
How to Enable and Disable Macros in Excel
Enable Macros On Excel can save time and reduce errors in Excel. However, they can also be a security risk, as they can contain malicious code that could harm your computer or steal your data.
You can enable macros on a case-by-case basis or change your macro settings in the Trust Center. To do this, open a workbook that contains a macro. When a Security Warning message bar appears, click Enable Content.
Enabling macros in Excel allows you to automate repetitive tasks, enhance data manipulation, and create more efficient workflows. Macros are sequences of instructions that can be recorded or written in the Visual Basic for Applications (VBA) language to automate tasks in Excel. Here’s a detailed guide on how to enable macros in Excel.
Macros are a set of instructions that automate repetitive tasks. In Excel, macros can be created using the Visual Basic for Applications (VBA) programming language. Enabling macros is essential for running and using these automated sequences.
Step-by-Step Guide to Enable Macros in Excel:
1. Open Excel:
Launch Microsoft Excel on your computer.
2. Access the Developer Tab:
The Developer tab is where you manage and create macros.
- Excel 2010 and later:
- Go to the “File” tab.
- Click on “Options.”
- In the Excel Options dialog box, click on “Customize Ribbon.”
- Check the “Developer” option in the right column.
- Click “OK.”
- Excel 2007:
- Click on the Office button.
- Choose “Excel Options.”
- In the Excel Options dialog box, click “Popular.”
- Check the “Show Developer tab in the Ribbon” option.
- Click “OK.”
3. Enable Macros:
Once the Developer tab is visible:
- Excel 2010 and later:
- Go to the “Developer” tab.
- In the Code group, click “Macro Security.”
- In the Macro Settings tab, select “Enable all macros.”
- Optionally, you can also choose to “Enable macros in digitally signed documents” for added security.
- Click “OK.”
- Excel 2007:
- Go to the “Developer” tab.
- Click “Macro Security” in the Code group.
- In the Macro Settings tab, select “Enable all macros.”
- Optionally, you can also choose to “Enable macros in digitally signed documents” for added security.
- Click “OK.”
4. Trust Center Settings:
Adjusting Trust Center settings may be necessary for proper macro functionality.
- Excel 2010 and later:
- Go to the “File” tab.
- Click “Options.”
- In the Excel Options dialog box, click “Trust Center.”
- Click “Trust Center Settings.”
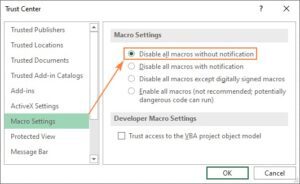
- In the Trust Center, click “Macro Settings.”
- Select “Enable all macros.”
- Click “OK” to apply changes.
- Excel 2007:
- Click the Office button.
- Choose “Excel Options.”
- In the Excel Options dialog box, click “Trust Center.”
- Click “Trust Center Settings.”
- In the Trust Center, click “Macro Settings.”
- Select “Enable all macros.”
- Click “OK” to apply changes.
5. Save and Restart Excel:
Save any open workbooks and restart Excel to apply the changes.
6. Security Considerations:
Enabling macros involves potential security risks. Be cautious when opening Excel files from unknown sources and only enable macros in trusted documents.
Macros are small programs that automate repetitive tasks in Excel.
Macros are small scripts that can automate a series of steps in Excel. These macros can save time and money, as well as increase productivity. However, they can also be a security risk, and they must be used carefully. To protect your computer, it is important to understand how to enable and disable macros in Excel.
The first step in creating a macro is to record the sequence of steps you want to perform. This can be done by clicking and dragging your mouse, or by pressing the keystrokes you want to perform. Then, Excel will record those actions and repeat them when you run the macro. This is an easy way to save a lot of time and effort. You can even assign a keyboard shortcut to a macro, so you can run it with just one click.
After recording the macro, you can save it and run it when needed. To save the macro, select a file location and click Save. Then, select a folder in which you want to save the file (e.g., Desktop). Once the macro is saved, you can double-click it to open it in Excel.
Once the macro is saved, you can use it to save a spreadsheet as a macro-enabled Excel workbook (XLSM). Then, other people who open the file will be able to see and use the macros. To prevent errors, it is important to back up your files before running a macro.
When you first open a file that contains macros, a yellow security warning message bar will appear. To enable the macros, select the “Enable content” option in the message bar. After that, the security warning will disappear. But, it is recommended to only enable macros from trusted sources. This will prevent the possibility of malware being executed by the macros.
They can also be used to create custom functions and automate complex calculations.
Macros are a powerful tool for anyone working with Excel. They can help save time by automating repetitive tasks and simplifying complex calculations. They are also useful for analyzing large datasets and performing data transformations. For financial analysts, macros can be used to perform complicated computations for budget projections and investment analyses. In addition, they can be used to create custom functions and automate them in spreadsheets, reducing the need for manual labor.
To use a macro, go to the “Developer” tab and click the “Record Macro” button. Then, perform the actions you want to automate and then stop recording. When you’re done, you can save the macro and use it anytime you need to perform those actions. You can even assign a shortcut key to the macro for easy execution.
When using a macro, you should always be aware of the security risks involved. Macros are a common target for hackers and can cause serious damage to your computer. To minimize these risks, it’s best to only enable macros in trusted documents. Additionally, you should keep your antivirus software up to date and avoid opening macro-enabled files from untrusted sources.
One way to minimize the risk of enabling macros is to save user-defined functions and macros in a personal add-in. This will prevent them from being executed by other workbooks and can protect your computer against malware and viruses. To create a personal add-in, open a new Excel workbook and go to the Developer tab. Then, click the Excel Add-ins option and browse to the file you saved in your Add-in folder. You can then type a description or leave it blank. Finally, click OK twice to close the remaining dialog boxes. Once the add-in is installed, it will automatically be activated when you open a new Excel document.
They can be a security risk.
Macros can be an incredibly useful tool for anyone who uses Excel on a regular basis. They can save a lot of time and reduce the risk of errors. However, they can also be a security risk if not used properly. Malicious code can be hidden in macros and used to harm your computer or steal sensitive information. This is why Microsoft disables macros by default and requires you to enable them before using a spreadsheet.
To enable macros in a file, open it and click the Enable Content button on the Message Bar. This will allow you to run the macros and mark the file as a trusted document so that you won’t see this Security Warning again in the future. If you want to enable macros in all files without seeing the Security Warning, you can change your macro settings in the Trust Center.
The Trust Center is where you configure all of Excel’s security and privacy settings. You can use the Trust Center to set macro security settings that determine whether or not you will be prompted for permission to run macros in Excel files that have been saved to a specific location. The first setting disables all macros without notification, which is the most secure option. The second allows you to enable macros on a case-by-case basis and the third option will allow you to run only those macros that have been digitally signed by a trusted publisher.
You can also use the Trusted locations feature to create a list of folders where Excel will automatically enable macros in files that have been saved in those folders. This can be especially helpful if you have a large number of files that you frequently work with. You can then select the folders that you want to include in your list.
Conclusion:
Enabling macros in Excel allows you to unlock the full potential of automation and customization. However, it’s crucial to exercise caution and only enable macros in documents from trusted sources to ensure the security of your data and system. Following these steps will help you enable macros and make your Excel experience more efficient and tailored to your specific needs.
Leave a Reply