
How to Enable Downloads on Mac
Having enable downloads on Mac? It may be due to an inaccessible application. There are many ways to fix this problem, including setting up Screen Time to prevent downloads for your family and children. In System Preferences, go to Content & Privacy. Next, click the Stores tab under Content & Privacy Restrictions. Select the option that corresponds to your needs. By default, this setting is off. If you want to enable downloads, choose On for the Content & Privacy Restrictions.
If you use an Apple computer, you’ve probably noticed that some apps have been labeled inaccessible. These apps may be referred to as launch agents or daemons, and they remain hidden in the background, collecting information. However, you can grant an app access later on. To do so, open your System Preferences by selecting the Apple menu, select Security & Privacy, and then select Accessibility. Click the checkbox next to the app you want to grant access to and drag it to the pane Google.
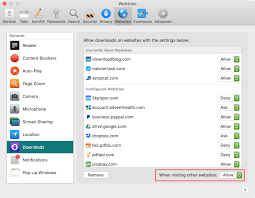
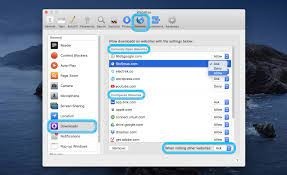
You can set up auto-downloads for specific websites in Safari. To enable these, open the Safari browser and go to the Preferences menu. Choose the Websites tab. Click the Allow button next to Websites, and then choose Allow downloads from other websites. This feature will allow you to accept or reject downloads from websites you visit regularly. Alternatively, you can choose to turn off auto-downloads altogether for certain websites.
How To Setting Up Auto-Downloads In Safari:
Unlike Chrome, Safari allows you to download files of a specific type safely. For example, you can choose to download images, PDFs, text documents, and archives. This option does not allow you to download software, but it does allow you to download text documents and images. To make the download process more efficient, select the option that prompts you before downloading. Alternatively, you can also choose to always prompt before downloading a file, which will remove the need to enter the file location every time you visit a website.
Changing the default Enable Downloads On Mac location in Chrome for Mac is relatively easy. You simply need to click the “Change” button and select the location you wish to use for downloads. This same procedure applies to other web browsers as well. After making your choice, click the “OK” button to apply your change. Now, your downloaded files will be stored in the new location. The downloads directory is now saved in the /Downloads folder.
Changing The Default Download Location In Chrome:
By default, downloaded files are saved in the Downloads folder on your computer. However, if you regularly download large files, you can change this location by changing the settings of your browser. To do so, navigate to the Chrome menu and click on the Advanced tab. Then, select “Change download location.”
Sometimes, you might not find the downloaded file in the place you expected. To remedy this, you can make use of the Finder’s search feature. To access the search box, hold down the COMMAND key and tap the Space Bar. The Finder will then search your entire system for the file you’re looking for. You can also use the ‘Finder’ search option by pressing Command + F. The search feature is a useful tool if you have lost your downloaded files on the Mac, but if you are not sure, here are some ways to find them.
App Security Settings On Your Mac:
- In System Preferences,
- Click Security & Privacy, then General.
- To make changes, click the lock and enter your password.
- Select App Store under the “Allow apps downloaded from” heading.
If you’ve downloaded a file from the internet, it’s usually saved in a folder called “Downloads” under your user account folder. Fortunately, macOS ships with a link to your personal Downloads folder in the “Dock” – the row of app icons across the bottom of your screen. This link is usually a folder icon with a downward pointing arrow. Once you’ve copied the file to your hard drive, you can view it and delete it.
Leave a Reply