
How to Enable DKIM in Namecheap
Enable DKIM In Namecheap is an ICANN-accredited domain registrar and web hosting company. It offers a variety of services including website builders, SSL certificates and a wide range of hosting plans.
Its streamlined interface makes it easy to manage your hosting account, and its uptime guarantee means that if you experience downtime for an hour, you get a free day of hosting.
Enable DKIM In Namecheap involves a few key steps to enhance email security and authenticity. DKIM helps prevent email spoofing and phishing attacks by allowing email recipients to verify that an email message was sent by the domain it claims to be from.
Step 1: Accessing Namecheap Account
1.1 Login to Namecheap Account:
- Open your web browser and navigate to the Namecheap website.
- Click on the “Sign In” button and enter your login credentials to access your Namecheap account.
Step 2: Navigate to Domain List
2.1 Domain Dashboard:
- Once logged in, you’ll land on the dashboard. Locate and click on the “Manage Domains” option. This will take you to a list of your registered domains.
Step 3: Select Domain
3.1 Choose the Domain:
- From the list of domains, select the domain for which you want to enable DKIM.
Step 4: Access DNS Settings
4.1 Navigate to DNS Settings:
- Look for an option like “Manage DNS” or “Domain Management.” Click on it to access the DNS settings for your chosen domain.
Step 5: Locate TXT Records Section
5.1 Find TXT Records:
- Within the DNS management page, locate the section that manages TXT records. This is where you will add the DKIM record for your domain.
Step 6: Generate DKIM Key Pair
6.1 Use a DKIM Key Generator:
- To enable DKIM, you need a DKIM key pair – a private key for signing outgoing emails and a public key published in your domain’s DNS records.
- You can use online tools or your email service provider to generate a DKIM key pair. Some popular services include DKIM Generator by EasyDMARC, or your email hosting provider might offer a DKIM key generation tool.
Step 7: Add DKIM Record to DNS
7.1 Enter DKIM Information:
- After generating the DKIM key pair, you will get a public key that looks like a long string of characters. This is what you will add to your DNS records.
- In the DNS management page, look for an option to add a new TXT record. Add the DKIM record, including the selector (a subdomain where the public key is published) and the public key itself.
Example:
Name: selector._domainkey.yourdomain.com

Value: v=DKIM1; k=rsa; p=MIGfMA0GCSqGSIb3DQEBAQUAA4GNADCBiQKBgQC...
Note: Replace “selector” and “yourdomain.com” with the appropriate values from your DKIM key pair.
Step 8: Save DNS Changes
8.1 Save Changes:
- After adding the DKIM record, save the changes in your DNS settings. The process may take some time to propagate across DNS servers.
Step 9: Verify DKIM Configuration
9.1 Check DKIM Status:
- To ensure DKIM is configured correctly, you can use online DKIM validation tools. These tools will check your domain’s DNS records to confirm that the DKIM key is set up correctly.
Step 10: Test DKIM
10.1 Send Test Emails:
- After configuring DKIM, send test emails to verify that the DKIM signature is present in the email headers.
- Check the email headers of the received message to confirm the DKIM signature.
Step 11: Monitor DKIM Performance
11.1 Monitoring and Troubleshooting:
- Regularly monitor your email deliverability and check for any issues related to DKIM. If you encounter problems, review the DKIM setup and DNS records.
Step 1: Generate a DKIM record
Enable DKIM In Namecheap is an authentication method for email messages. This helps to protect against spoofing and other types of fraud. It also allows email providers to filter spam more effectively.
Enabling DKIM for your Namecheap account is easy and straightforward. The process only involves a few simple steps, and once it’s done your emails will be more secure and more likely to reach the inbox of recipients.
Before you can set up DKIM, you’ll need to create a DKIM record. This record will specify which servers are authorized to send emails on behalf of your domain. To do this, log in to your Namecheap account and click the “Domains” tab. Select the “Manage DNS records” option for your domain. Then, click the “Add a new record” button. Fill in the fields with your domain name, record type, hostname, and value.
After completing this step, you should see the DKIM record appear in your list of DNS records. You can now proceed to the next step: adding the DKIM record to your domain’s DNS settings.
Step 2: Add the DKIM record to your domain’s DNS settings
DKIM, or DomainKeys Identified Mail, is an email authentication protocol that verifies the sender of a message. This is a valuable tool for businesses and individuals who want to prevent spamming and phishing attacks against their brand and customers.
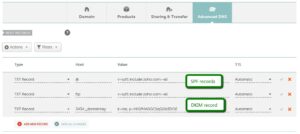
To enable DKIM for your domain, you need to add the record as a TXT record in your DNS settings. To do this, navigate to your domain list and select the one you want to edit. Then, click ’Manage’. This will open a new window. Select ’Add or Edit DNS Records’. Then, choose ‘TXT Record’ as the type and enter a string in the ‘Hostname’ field. Then, add the value s1_domainkey generated earlier.
Once you’ve added the record, it should take a few hours for the change to propagate across all servers on the internet. it has, you can verify that your DKIM setup is working by using online DKIM checkers.
Once you’ve verified that your DKIM setup is working, you can start using it to protect your brand and customers from spam and phishing attacks. You can also use it to improve your email deliverability rates by ensuring that emails sent from your domain are authenticated properly.
Step 3: Verify the DKIM setup
DKIM, which stands for DomainKeys Identified Mail, is an authentication method that uses public/private key pairs to verify the identity of an email sender.
Enabling DKIM on your Namecheap account is a simple and straightforward process that can be done in just a few steps. First, you’ll need to generate a DKIM record. Then, you’ll need to add the record to your domain’s DNS settings.
Once the DKIM record has propagated, you can use online tools to verify that the signature is working properly. If you have any issues with the DKIM setup, please contact your email service provider for further assistance.
Conclusion:
Enabling DKIM in Namecheap involves navigating your account, accessing DNS settings, generating a DKIM key pair, adding the DKIM record to your DNS, and verifying the configuration. It’s essential to regularly monitor and test DKIM to ensure optimal email security. By following these steps, you enhance the authenticity of your email communication and reduce the risk of phishing and spoofing attacks.
Leave a Reply