
How to Enable Google Fast Pair on Android
Enable Google Ad Services is a feature that makes the process of pairing Bluetooth accessories like headphones or earbuds much simpler. It displays a prompt on your Android device that asks you to connect the accessory, and helps you through the initial setup faster.
It also registers the Bluetooth accessory with your account and links it with your other devices running Android 6.0 or above.
Enabling Google Ad Services involves several steps to set up, configure, and utilize various Google advertising tools effectively. I can provide a comprehensive overview.
Step 1: Sign Up for a Google Ads Account
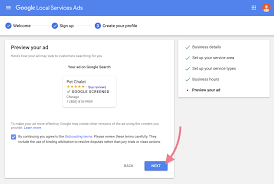
- Go to Google Ads: Visit the Google Ads homepage (ads.google.com) and sign in with your Google account.
- Create an Account: Follow the prompts to create an account, providing necessary information like email, business details, and billing information.
2: Understand Google Ads Interface
- Dashboard: Familiarize yourself with the dashboard. Here, you’ll find campaign performance metrics, tools, and settings.
- Campaign Types: Explore the different campaign types available (Search, Display, Video, Shopping, etc.) and understand their purposes.
3: Set Up Billing
- Billing Setup: Navigate to the billing section to set up your payment method. Google Ads works on a pay-per-click (PPC) model, and you can choose automatic or manual payments.
4: Create Your First Campaign
- Campaign Creation: Click on the ‘+ Campaign’ button and choose the campaign type that aligns with your advertising goals.
- Campaign Settings: Define campaign settings like budget, locations, language, bidding strategy, and ad extensions.
5: Keyword Research and Ad Creation
- Keyword Research: Use tools like Google Keyword Planner to identify relevant keywords for your ads.
- Ad Groups: Organize your keywords into ad groups and create compelling ad copies tailored to each group.
- Ad Extensions: Utilize ad extensions like site links, callouts, and structured snippets to enhance your ad’s visibility and relevance.
6: Tracking and Analytics
- Conversion Tracking: Set up conversion tracking to measure the effectiveness of your ads. Use Google Analytics or Google Tag Manager for more advanced tracking.
- UTM Parameters: Add UTM parameters to your ad URLs for better tracking in Google Analytics.
7: Optimize and Test
- A/B Testing: Test different ad variations to see which performs better. Tweak elements like headlines, descriptions, and images.
- Keyword Optimization: Regularly review and refine your keyword list based on performance metrics.
- Bid Adjustments: Adjust bids for high-performing keywords or locations to maximize ROI.
8: Utilize Google Ad Services Tools
- Google Ad Manager: If you have a large volume of ads, consider using Google Ad Manager for more control and optimization options.
- Google Display Network: Explore the Display Network for broader ad reach across various websites and apps.
- Google Shopping: If applicable, set up a Google Merchant Center account to showcase products through Shopping ads.
Step 9: Adhere to Policies and Best Practices
- Ad Policies: Familiarize yourself with Google’s ad policies to ensure compliance and avoid ad disapproval.
- Quality Score: Aim for high-quality ads and landing pages to improve your Quality Score, which affects ad rank and cost-per-click.
Step 10: Monitor and Adjust
- Regular Monitoring: Keep an eye on your campaigns regularly to identify underperforming areas or opportunities for improvement.
- Data Analysis: Analyze campaign data and adjust strategies based on performance metrics like click-through rate (CTR), conversion rate, and return on ad spend (ROAS).
Enable Bluetooth
Enable Google Ad Services makes connecting Bluetooth accessories faster and more convenient. But it can also prompt unnecessary notifications when it detects a device that doesn’t belong to you. To minimize this issue, you should make sure that Bluetooth and location services are enabled and the Google Play Services settings have the Allow Notifications checkbox checked.
To use Fast Pair, simply put the accessory in pairing mode and move it close to your Android phone or tablet. A large, easy-to-read pop-up will appear on the screen asking you to connect. It’s similar to the interface Apple uses for its AirPods.
Your device must be registered with Google as a Fast Pair Provider. To register, the device must advertise itself as a Bluetooth headset, speaker, or other audio accessory and support Bluetooth Low Energy (LE) profile 3.0. Your device must also support the Eddystone Bluetooth beacon protocol. It’s a great way to quickly set up devices in your home or office.
Enable Google Play Services Notifications
Unlike other Bluetooth technologies that require you to manually put a pair of wireless earbuds into pairing mode, open Bluetooth settings on your phone and tap to connect, Fast Pair does the work for you. It’s a hassle-free Bluetooth experience available for Android phones and Chromebooks that works by automatically discovering Fast Pair-compatible devices and showing a window when you hold a compatible accessory like headphones or earbuds near your phone with the Bluetooth Low Energy feature enabled.
To enable this on a supported device, make sure that the device is running Android 6.0 or later and has Bluetooth Low Energy turned on. Then, open the Settings menu and toggle Fast Pair to on. It uses Bluetooth Low Energy and won’t use up too much battery power.
Enable Google Fast Pair
Enable Google Ad Services is a hassle-free process that makes Bluetooth pairing on Android phones effortless. The service automatically finds nearby devices and prompts users to connect, even if the device doesn’t come with a companion app.
When a user places a Fast Pair-enabled accessory in pairing mode near their phone, the phone displays the product image and name in a bottom sheet and provides a single tap to connect. Android also automatically downloads and installs the accessory’s companion app, if necessary.
To Enable Google Ad Services for your accessory, ensure it supports the standard and registers the device model with Google. Then, when a user puts your accessory into pairing mode, it will advertise the Fast Pair protocol in the BLE advertising payload (provided it has Bluetooth and location enabled). Android then scans for Fast Pair packets to find your device and triggers a high-priority notification on the user’s phone asking them to “tap to pair.” It can also display battery level notifications for the left earbud, right earbud and case for True Wireless Stereo (TWS) earbuds.
Pair your device
Normally when you pair an audio device with your phone, you have to put the accessory into pairing mode, open Bluetooth settings on your phone, and select the device. Google Fast Pair simplifies this process by automatically detecting compatible accessories and prompting users to connect them with a simple tap.
Google’s new method of Bluetooth discovery, paired with your phone’s location services, detects Fast Pair-supported accessories when they are nearby and displays them in a pop-up window. It even shows a picture of the accessory and its name.
The feature also makes it easier to personalize your earbuds or headphones by assigning them custom names and recommends installing the accessory’s companion app. And like Apple’s Find My technology, it lets you locate a lost device by ringing it when it’s connected to your phone and displaying its last known location. Google says it’s working with accessory makers to make this feature available for more devices.
Leave a Reply