
How to Enable TPM or PTT in BIOS
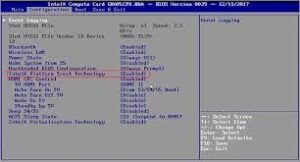
In the BIOS, you can choose to run the computer in Advanced Mode or Easy Mode. In the Advanced Mode, look for the TPM feature. It will appear under Intel PTT (Platform Trust Technology). After making the desired changes, press F2 to save the changes and exit the BIOS. Then, restart the computer to complete the process. Enable TPM Or PTT In BIOS
If you want to enable Gigabyte TPM or PTT on your motherboard, then you must first access the BIOS. The BIOS settings for the TPM or PTT can be found in the ‘Settings’ tab. Once you have selected the setting, you need to reboot the computer in order to enable it Google.
TPM is a security feature that is built into many motherboards. Gigabyte motherboards are designed with this technology integrated. Windows 11 requires motherboards support this feature. This motherboard feature strengthens the security layer on your PC. It is a must-have for those looking to upgrade to the latest version of Windows.
How To Enable TPM 2.0 In BIOS Asus:
If your motherboard does not have a TPM or PTT, you can enable it by upgrading the BIOS. You can find out which motherboards support TPM or PTT in BIOS by visiting the manufacturer’s website.
The first step to enabling TPM or PTT is to find the appropriate BIOS setting on your motherboard. If you’re running an Intel board, the settings can be found under the Settings menu. Under the Security tab, choose the Trusted Computing section and set the TPM Device Selection to PTT. If you’re using an AMD board, the settings are in the Security tab. Under the Security Device Support section, select the AMD TPM switch.
How To Enable TPM In Asus BIOS:
There are several ways to enable the TPM or PTT in your BIOS. If you’re using a motherboard with an Intel chipset, you’ll have to enable Intel Platform Trust Technology (PTT). AMD’s TPM switch requires that you enable PTT before you can enable TPM.
Then, select the BIOS section for your motherboard brand. Some computers let you navigate through the BIOS menu with the arrow keys, while others let you navigate by pressing Enter. After making any necessary changes, save the BIOS settings by pressing F2 or F5. If you’re using a laptop, reboot your computer to complete the process.
How To Enable TPM 2.0 In BIOS MSI:
To enable the TPM in a Gigabyte Cyber Power PC system, go into the BIOS settings. The BIOS will be on ‘EASY MODE’ when you first boot it, but it can also be switched to ‘ADVANCED MODE’ by going to the ‘Settings’ tab. Under the Miscellaneous section, find and enable the AMD CPU TPM. Then reboot your computer and check if the TPM is enabled.
Enabling the TPM system is easy to do. The BIOS will give you options to enable TPM and PTT, and you can also enable them from the UEFI settings. Make sure to enable the TPM 2.0 feature in your system. If you have an AMD processor, you can also enable TPM 2.0 by installing the TPM module.
Click And Settings:
- How to enable TPM in BIOS.
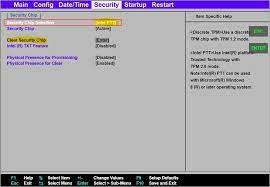
- Go to the BIOS and find the “Security Device Support” entry to enable the TPM 2.0 module.
- Click BIOS 5 – If your BIOS works Click BIOS 5,
- You will find “Security Device Support” in “Settings\Security\Trusted Computing”.
- Enable “PTT” on Intel motherboard or “AMD CPU fTPM” on AMD motherboard.
While the Trusted Platform Module isn’t a simple technology, the benefit of using it to secure your system is clear: it prevents attackers from gaining access to important information. As the TPM is physically inside your computer, an attacker is less likely to be able to spoof it or tamper with it. This is one of the many benefits of using TPM technology in your system.
Leave a Reply